
This website may earn commissions from certain purchases via the Amazon Associates program at no cost to you.
You’ve spent days—perhaps weeks—meticulously laying your new porcelain tile. The grout is cured, the lines are perfect, and the bathroom looks like a showroom. Now comes the “moment of truth”: you need to drill four holes to mount a $400 glass shower door or a heavy-duty grab bar.
This is the point of no return. In the world of home renovation, porcelain is the “Final Boss.” Unlike its softer cousin, ceramic, porcelain is incredibly dense, brittle, and unforgiving. Use the wrong tool or too much pressure, and you won’t just ruin a tile; you risk cracking the substrate and compromising your waterproofing membrane (like Schluter or Kerdi), turning a 10-minute task into a $1,000 disaster.
This guide provides the professional-grade protocol for drilling through Grade 5 porcelain with zero cracks, zero “bit-slip,” and zero stress.
Essential Tools: Why You Can’t Use Standard Bits
If you approach porcelain with a standard masonry bit or a cheap carbide-tipped bit, you will likely watch it smoke and glow red within 30 seconds without making a dent. Porcelain is essentially a specialized form of glass fired at extreme temperatures, making it harder than steel.
The Diamond Core Bit vs. Carbide
For Grade 4 or Grade 5 porcelain, diamond core bits (or diamond hole saws) are non-negotiable. While carbide-tipped bits work for soft ceramic, they rely on a “chisel” action that porcelain resists. Diamond bits work through abrasion—they literally grind the tile away. Look for “vacuum-brazed” diamond bits for the longest lifespan.
Variable Speed Drill
Leave the impact driver in the bag. You need a cordless drill with a highly sensitive variable-speed trigger. The key to drilling porcelain is maintaining a consistent, low-to-medium RPM. High-speed corded drills often lack the finesse required to prevent the bit from overheating and “glazing over.”
The Cooling Setup
Heat is the primary enemy of both your tile and your drill bit. You must have a cooling strategy ready:
- The Wet Sponge: Hold a soaking wet sponge against the bit as it spins.
- The Spray Bottle: Have a partner mist the site constantly.
- The Plumber’s Putty “Dam”: Create a small ring of putty around your mark and fill it with water to create a self-contained cooling pool.
Step-by-Step: The “No-Slip” Precision Method
The biggest fear for any “High-Stakes DIYer” is the bit “wandering” or “walking” across the polished tile, leaving a permanent zig-zag scratch. Here is how to lock it down.
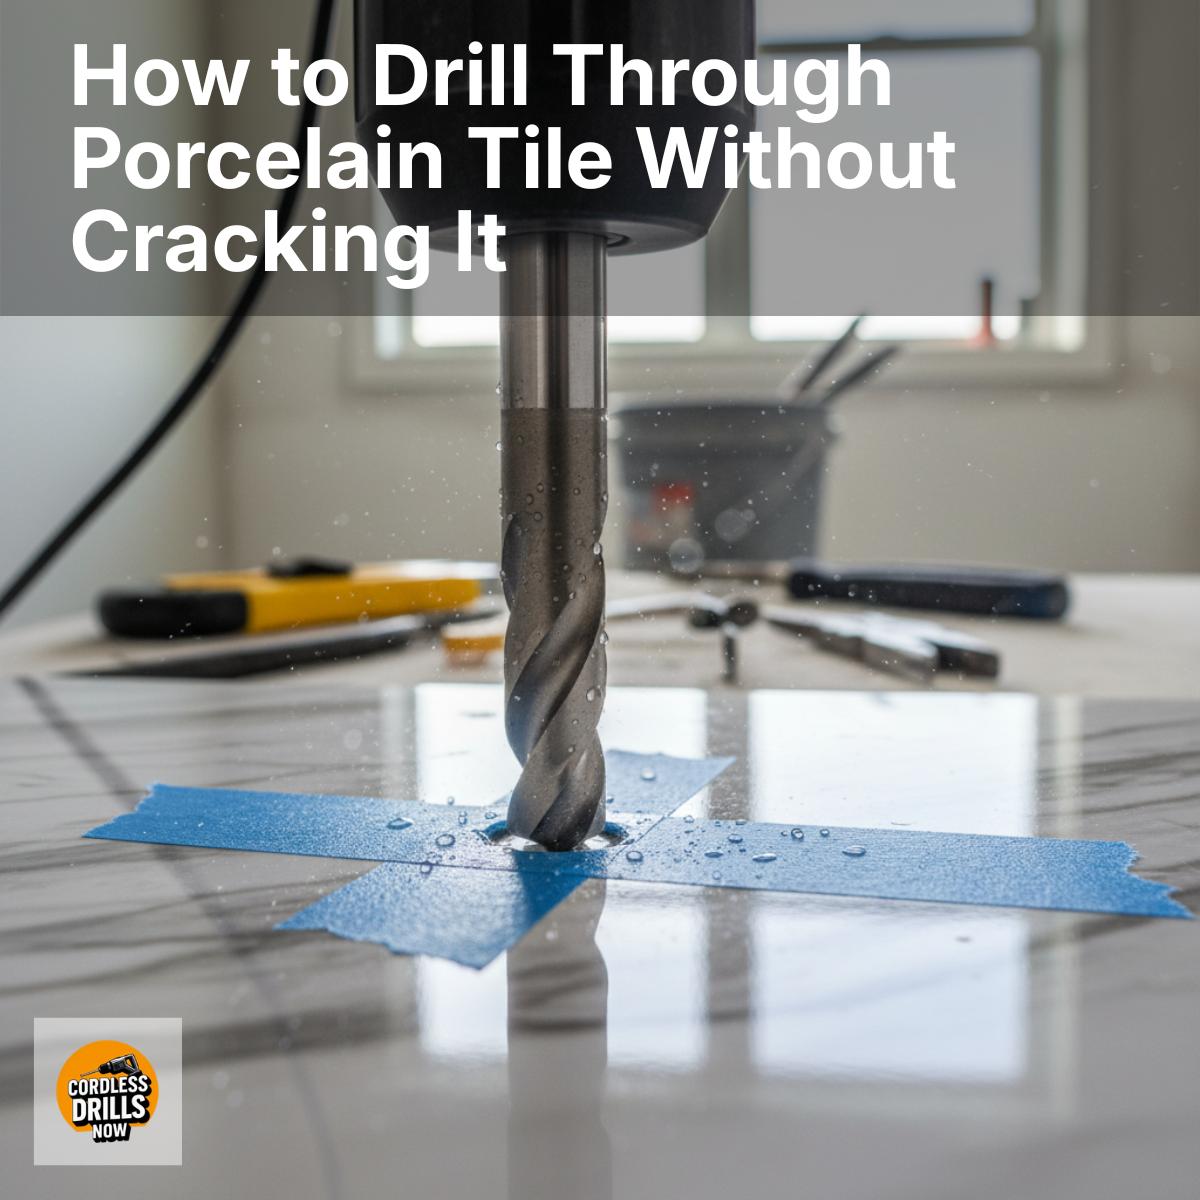
Step 1: Marking and Masking
Don’t mark directly on the tile. Place two strips of blue painter’s tape in an “X” over your drill site. The tape provides two benefits: it gives your pencil a clear surface to mark on, and it provides just enough “grip” to help the diamond bit find its purchase during the initial contact.
Step 2: The 45-Degree “Catch” Technique
Professionals never start a hole by pressing the bit flat against the tile. Because diamond bits lack a center pilot point, they will skate across the surface.
- The Move: Start your drill and approach the tile at a 45-degree angle.
- The Goal: Use the edge of the diamond rim to ground a small “crescent moon” or notch into the tile. Once the notch is deep enough to hold the bit in place, slowly pivot the drill up to a 90-degree angle while it’s still spinning.
Step 3: Low RPMs, Steady Pressure
Once you are upright, let the diamonds do the work. If you lean your full body weight into the drill, you will create excessive friction and heat. Apply firm but steady pressure. If you see smoke or smell burning, you are going too fast or pushing too hard.
Step 4: Constant Lubrication
Never “dry drill” porcelain. Keep the bit submerged or misted. If the water turns into a thick “slurry” (a milky paste of tile dust), wipe it away and add fresh water. This slurry acts as an abrasive that can actually wear down the bit’s shank if not cleared.
The Critical Rule: Never Use “Hammer Mode”
If your drill has a hammer icon on the collar, do not engage it.
Hammer mode is designed for masonry like brick or concrete block; it uses a rapid back-and-forth percussive strike to shatter material. Because porcelain is a dense, brittle sheet, the “hammering” action will cause a catastrophic stress fracture, likely cracking the tile from the hole all the way to the nearest edge. Porcelain requires rotary-only abrasion, not impact.
What to Do Once You Reach the Substrate
A common mistake is using a diamond bit for the entire depth of the hole. Diamond bits are engineered for hard, brittle surfaces. Once you feel the drill “drop” or the resistance change, you have likely hit the substrate (wood studs, plywood, or cement board).
Switch bits immediately. Using a diamond bit on wood will cause the bit to “glaze”—the wood fibers and sap will coat the diamonds, rendering the tool useless for the next hole. Switch to a standard wood bit or a multi-material bit to finish the depth needed for your anchors.
Common Mistakes That Lead to Cracking
- Overheating the Bit: If the diamond tip turns blue or black, it has lost its temper. A “glazed” bit won’t cut; it will only generate heat, which will eventually cause the tile to undergo thermal shock and crack.
- Drilling Too Close to the Edge: Try to stay at least 1 inch away from the edge of the tile. The edges are the most vulnerable points for stress fractures.
- Ignoring the “Thinset Gap”: If the installer didn’t achieve 95% thinset coverage (common in DIY jobs), there may be an air pocket behind the tile. When you apply pressure to drill, the unsupported tile can “flex” into that void and snap. If you hear a hollow “thud” when tapping the tile, proceed with extreme caution and very light pressure.
Summary Checklist for a Crack-Free Hole
Before you pull the trigger, run through this “Insurance Checklist”:
- Bit Check: Is it a Diamond Core/Hole Saw bit? (Not carbide).
- Settings Check: Is the drill in “Drill” mode? (Not Hammer).
- Surface Check: Is there painter’s tape on the mark?
- Coolant Check: Do you have a wet sponge or spray bottle ready?
- Technique Check: Are you ready to start at a 45-degree angle?
By following this protocol, you move from “hoping it doesn’t crack” to “knowing it won’t.” Take your time, keep it cool, and let the tool do the heavy lifting.